Friday, April 22, 2011

Faberge Box

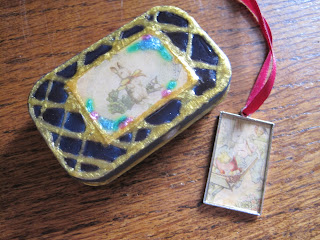
The Metallic Color Lacquer made me think of Faberge Eggs for Easter.  Since a few of the DT ladies did such amazing Easter Eggs witht he Color Lacquer I decided to make a Feaux Faberge Box, and Easter Pendant.  Here's what I used.


Metallic Color Lacquer
3D Crystal Lacquer
Jewelry Finding
Altoid Smalls Tin
Easter Images from Tim Holtz Seasonal Paper Stash

For the Pendant, I trimmed a Vertical Easter image to the size of the finding, glued it in place with a small dot of Clear Crystal Lacquer, and filled the top of the image, inside the Jewelry Finding with Clear Crystal Lacquer and set it aside to dry.


For the Box, I painted an Altoid Tin with blue paint. I centered my Horizontal Easter Image and adhered it with Clear Crystal Lacquer.  I framed the image with the Gold Metallic Color Lacquer, and created my Fabrage design.  I let that dry and then filled in the blue spaces with some Blue Color Lacquer to give it a more enamel look, like fabrage has.  I added metallic details on the image itself, then filled the whole image in with Clear Crystal Lacquer.


I set it to dry over night and Voila!!

I think this could make a lovely Easter Hostess Gift.  I love the way it turned out and just working on it I got a lot of fun ideas of ways to make faberge designs with Metallic Color Lacquer.  For more great ideas check out my blog and the Sakura Craft Design Team Blog!

Have a Happy Easter!!
~Chelsea

Friday, April 8, 2011

Spring Tag

For this tag I decided to use the Metallic Crystal Color Lacquer as a glaze.
To make the charm, I simply used some springy rose stickers I had and arranged them inside the Jewelry Finding, filled it with Crystal Lacquer and set aside to dry.  

I used the metallic blue Lacquer on the Acrylic S (Heidi Swapp Ghost Letter), by spreading it with my finger.  I added some dots in silver for detail, and set that aside to dry.  I distressed the edges of a plain white tag with Distress Inks in Spun Sugar, Bundled Sage, and Broken China.  Next I stamped the Fairy Swing stamp (Crafty Secrets) in black ink, and wrote "pring" for the word Spring at the top.  It's important to make sure you do all your ink stuff first, before you move to the next step.  
I applied gold, silver and pink Metallic Color Lacquer again with my finger as a glaze coating to add shimmer and texture.  It dries fairly quickly because it's so thin, so you can layer them over each other as you go, and it adds a neat effect.
Next I filled in spots on the fairy image with green, pink and blue Metallic Color Lacquer.  I adhered the S using Crystal Lacquer and filled the images of just the fairies with Crystal Lacquer to make them stand out.
Finally I attached some lace and ribbon at the bottom with Crystal Lacquer and Tiny Attacher Staples, and tied the charm on (once it dried) with some fairylike ribbon.  Tada!


~Chelsea

*Check out my blog and the Sakura Craft Design team Blog for more fun ideas*