Wednesday, May 25, 2011

Playing in the Dirt: Part 2

After some weird weather and scheduling hang ups, we finally got the second Vegetable garden going!
When I wasn't around Mom managed to enlist some help in the way of the neighbor kids and got a nice square dug up for our garden box to fit in.
The next day we got the box put together and level, then got the compost and planting soil in there and all the plants and seeds.
In this one we have:
Kale, Green and Yellow Onion Seeds and Garlic Bulbs
Pole Bean, Lettuce, Strawberries, Butternut Squash, Market Cucumbers, Painted Serpent Cucumbers, and Eggplant.
Some of them I did in the other garden, in this one I didn't do Jalapenos, or Tomato seeds (mom already has some cool tomato plants)  And we are doing the butternut squash, cucumbers and Kale (none of which interested the boy, but mom and I love!)
To make sure we have enough room, we planted lemongrass near the tomato and tomatillo she already had, and we planted the Artichoke seeds in the unoccupied flower bed... we're thinking those are going to get huge and need to be transplanted, but this is just the beginning of some possible landscaping we want to DIY!
Just to remind you we already planted out barrel of herbs, which seems to be doing great!
I am really excited and looking forward to just giving updates on progress now that everything is planted.
Speaking of progress...
both gardens have strawberry plants that we bought with some berries starting to grow on them.  On monday I checked the boy's garden and it looks great!  By tuesday all the berries seem to have gone missing.  So we have an uninvited dinner guest.  The rest of the veggie garden looked fine, not creatures or bugs or holes in leaves.  The other garden is yet undiscovered by the squirrels that frequent the yard, and rendered some nice red berries already!  They were still a little tangy so I was probably anxious in picking them, but can you blame me?  If the critters wanna eat they have to help plant!!


The cool thing is, between the weather and anticipation of the delicious plants, it's gotten wheels turning for more landscaping, so feel free to weigh in with suggestions and advice!
~Chelsea

Thursday, May 19, 2011

Stain Glass Votives

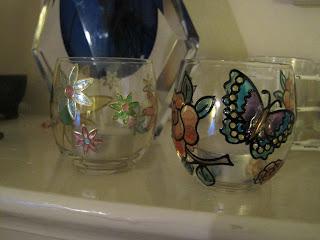
I had an idea to use Crystal Color Lacquer on these glass Votives a while back, I tried it freehand, as an Easter project, but I didn't like the way it came out, because of my poor freehand skills.  These outline stickers got me so excited to try again, and the results were even better than I expected.
What I used: 
glass votive globes from the craft store, outline stickers, 
The process is fairly simply.  Stick the stickers on the glass, in whatever design pleases you.  I wanted to use some of the larger stickers but the roundness of the votive bulbs made it easier to use the medium and smaller shaped stickers, they are more forgiving, and make sure you smooth them down.
 Next paint them in with the Color Lacquer, YAY COLORING!!  I used the all the colors in both sets, Metallic with the Gold Stickers to emulate faberge, or enamel.  Then the Primary colors on the black outline stickers, which has a nice stained glass effect.  Then let dry, add a tea light and enjoy!
I am thrilled with the result, they are both completely different.  I think they are a perfect addition to the summer garden I just planted.  Tres romantique!  
Don't forget to check out other fantastic ideas by the lovely and talented Sakura Craft Design Team!!
~Chelsea

Tuesday, May 17, 2011

In a Nutshell

With the gloomy weather change, this was today in a nutshell.  


Monday, May 16, 2011

Playing in the Dirt: Part 1

Since I obviously needed yet another hobby, welcome to my foray into gardening.  Okay, I have gardened, or helped garden, my mom has always had a lovely garden, wonderful roses, but neither of us have ever attempted a vegetable garden.
My boyfriend lives in a guest house and the front neighbors and us decided to plant vegetable gardens in a flower bed in the back of his yard, that had become overgrown.  So they cleared it out and planted their seeds, and we began planning what we wanted to grow.  This got my mom inspired to do one too, she always grows tomatoes, but we've never done a real veggie garden, so here we go!  I've decided to blog the progress of both.
We went to the nursery and got a whole slew of seeds and plants, some compost, and some markers.  We probably went a little nuts, but we are planting two different gardens.  Here's the booty!
 So mom and I started a nice big barrel looking planter for an herb garden.  We had some cilantro we'd been growing in the greenhouse window from seeds, and then we transplanted the dill, rosemary, and thyme plants we had gotten.  After a couple days we could tell squirrels were using it to bury things, so that should be fun.
 So today I got the Vegetable Garden at my boyfriend's going.  Both gardens have some duplicates and some differences.  We had already planted Garlic by planting cloves in the ground and those had already sprouted about 8" (bottom left foreground) which is very exciting, and some tomato seeds have already started to sprout very tiny.  So today we planted Green and Yellow Sweet Onions, Artichoke all from seeds.  Green Bean,  3 Bibb Lettuce, and Strawberry Plants.  All of which I will be planting with mom.  Then we also planted Jalapeno seeds (for the boy who likes spicy stuff) and a Black Beauty Eggplant. (plant)
 The herbs we did are mostly the same, I had started him an herb garden, which he took great care of, so we transplanted those, Basil, Chives, and Parsley (stupid parsley as we call it, because we don't really use it) then the Dill, Rosemary and Thyme plants I had gotten at the same time as the ones I planted with mom.
I was really impressed with the soil, I think all the weeds that had been there before the neighbor cleared it out had really done some good work, and it even seemed composty!  So we labeled and watered, and are hoping for the best. It was nice and overcast so it was not fatiguing at all, and it may even rain tomorrow which would be great. Weather permitting I want to prep the soil and set up our planting areas for mom and I to get planting.  There are some flowers I would love to get in the ground too.

Anyway, I will definitely keep you updated on the progress. I am really excited about these gardens, there is something comforting and triumphant about planting, my guy kept singing "Circle of Life"  I am reading The Year I Ate My Yard and I love his philosophy.  Read it, even if you don't want to garden!
Cheers   
~Chelsea

Friday, May 13, 2011

Steampunk Gift Card Wallet

I don't have instructions with this one, I made it a month or 2 ago and forgot to put it up here.  It's a little wallet for keeping (or giving) gift cards.  I have made them before, all different designs, so I decided to do a steampunk one to replace my pretty green and blue one that was falling apart.

 It's essentially put together with Chipboard cover and back, which I cover with a sturdy patterned paper, I have an envelope like template for the pockets inside, which are just the right size for gift cards, and then the binding is just accordion folded and adhered to the inside of the covers, with the pockets glued firmly inside the accordion folds.  
 I usually use ribbon across the binding as reenforcement, but this time I used some grungeboard hinges/door brackets. It looks more steampunk and is super sturdy.  I used metal flowerers I distressed with paints, as well as stickers from 7Gypsies for a vintage feel, and to add some quirk.  I also used some embossed and inked grungeboard flowers, paper word tags, and a few cogs.
I hope this gives you some fun ideas.  I had a really good time making it!  If you have any other ideas for things I can make in this style let me know, I love scrapbooking, but I am really into handmade, utilitarian, practical items at the moment.

I just started my first attempt at growing vegetables and an herb garden, so I'm photographing those and I will start posting the progress on here as well.  As always love to hear comments and thoughts!
~Chelsea

Thursday, May 5, 2011

Mother's Day Keepsakes

Since Mother's Day is this Sunday I decided to make some nostalgic necklaces with Sakura Craft's awesome products.

 I'm making gifts for my mom and for my stepmom.  The first one is for my mom, it's a photo we recently came across of my grandmother when she was 19 or 20. I shrunk it down to the right size to fit my Glass Pendant, printed it on cardstock and cut it out.
 I used a few small dots of Clear 3D Crystal Lacquer on the front of the picture and placed the Glass Pendant on top, make sure you get any bubbles out, you don't need a lot of the Lacquer for it to stay, just make sure you get the edges. I also cut some pretty paper the same size as the picture and stuck that to the back, just so I didn't have the plain white cardstock on the back.
Then I used the Lacquer to adhere some paper flowers, my grandmother LOVED flowers, and a rhinestone in the center.  I attached a white brass Bail to the back with Lacquer and threaded my Chain through and VOILA!!
For the second one I chose a writing theme, my stepmom is a writer.  I chose an image from G45's Communique tags and trimmed it to fit the Glass Pendant, the same as I did for my mom's.
I attached the bail to the back of the whole pendant, and I threaded a neat charm of a victorian lady's hand on the chain as well to add to the personality.


I love the way they both came out, and they couldn't be easier!  I love the way these glass pendants and chains make jewelry making so personal and unique. I am always looking for something with a "how did you do that" factor and these are definitely that!

Hope you like these ideas, for more great ideas check out The Sakura Craft Design Team Blog
Also feel free to share ideas, and pictures in my comments!

~Chelsea